
Fully embracing modern web technologies, the new ImageView Viewer offers a fresh, responsive,...
We all thought emails would reduce in significance for businesses and be replaced by more guaranteed methods of communication. That makes sense, but as we all know, it’s not always what makes sense that actually happens. So it is with email, a simple and easy communication method between businesses and these days pretty reliable too.
So you receive emails and you want to import them into your document management system. Maybe you just need to import the attachments, or perhaps it depends upon the email. This How To is for ImageView users and describes how WebView2 can help (if you are not using WebView2 yet, then please get in touch with us). This is only one way to import emails, and of course other documents can be imported too. If you have a large number of emails, then you will probably want to use some kind of automation such as the PacSol IEP or Kofax.
- In your browser, open WebView2. Have your browser occupy about half your screen. In the other part open your email client (such as Microsoft Outlook), and select the email to import.
- In WebView2 locate the folio where you want to import the email (by choosing the application area from the drop down list, and then typing the folio key in the search box). Open the document list of the folio (by clicking on the folder icon on the left).
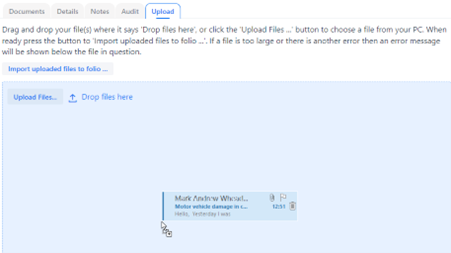
- Once in the folio, click on the Upload tab along the top.

- From your email client, using your mouse, left click and hold and drag the selected email and drop it (let go of the left mouse button) into WebView2. The panel will turn blue as you drag the email over. If you have other emails or files (in Windows Explorer) you may drag them over too, or of course, add them later. My example (fictional) email was written to my insurance company telling them I had damaged my car whilst manoeuvring in a multi-story car park. For some reason I felt it necessary to send them a PDF of my insurance, and a photo of the damage to my vehicle.
- Once you have finished dragging all the emails and files you want, press the button entitled Import uploaded files to folio … The dialog box below will be shown:
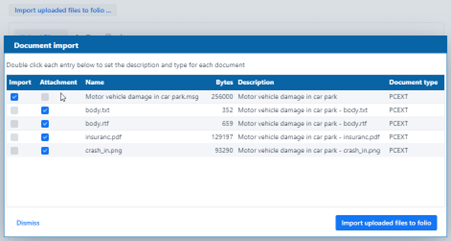
- Here we see that although only one email was dropped, five documents are listed – what’s going on? The first entry is the email as a whole, like you see it in your email client. It includes the attachments. The next two documents are versions of the text of the email, one without formatting the other with formatting. The last two are the attachments – there were two attachments to the email.
- You can choose which elements of the email to import. In this example my insurance document probably won’t be needed so insurance.pdf can be unticked. Perhaps we will be happy with the text of the email rather than the whole email so the first and second entries could be unticked leaving just body.rtf and crash_in.png ticked.
- The text in the description column is automatically set based on the email subject. Double click on a description to change it. Likewise the document type can also be changed and a different type chosen from a drop down list.
- When happy with the selection, press the button entitled Import uploaded files to folio.
- Return to the Documents tab, then press the Refresh button to see the newly imported documents. There will be one document for the email text, and another for the photo of the crash damage.
I hope this How To has been helpful in showing how easy it is to import emails directly into a folio using drag and drop. WebView2 is under active development so expect new features in 2023. If you have any comments, queries or suggestions then please get in touch.

Mark Wheadon, Technical Director. November 2022
#PacSolUK #DocumentManagement #EnterpriseContentManagement #BuisnessProcess #Environment